WhatsApp Inbound Calling
Looking for an overview first? See the WhatsApp Voice AI product page for use cases, pricing, language support, and competitor comparisons. This page is the technical setup guide.
This guide walks you through connecting your WhatsApp Business account to Edesy so your voice agent can pick up incoming WhatsApp calls and have a real-time conversation with the caller — no separate phone line required.
WhatsApp Business Calling is a great fit when:
- Your customers already reach you on WhatsApp, and you want a 24/7 AI agent on the same number
- You want to avoid setting up a Twilio / Plivo / Exotel account just to handle inbound voice
- You operate in regions where WhatsApp is the dominant communication channel
Prerequisites
Before you begin, make sure you have:
- A Facebook account (a personal account is fine — Meta Business Manager and the WhatsApp Business Account are created automatically when you set up the app)
- A phone number that is not already registered on WhatsApp. A virtual / VoIP number from providers like Twilio, Plivo, or Vonage works
- An Edesy workspace with at least one voice agent configured. If you haven't built an agent yet, see Creating an Agent
No Meta Business Manager account required upfront. When you create an app with the WhatsApp use case, Meta automatically creates a Test WhatsApp Business Account and a Business Portfolio for you.
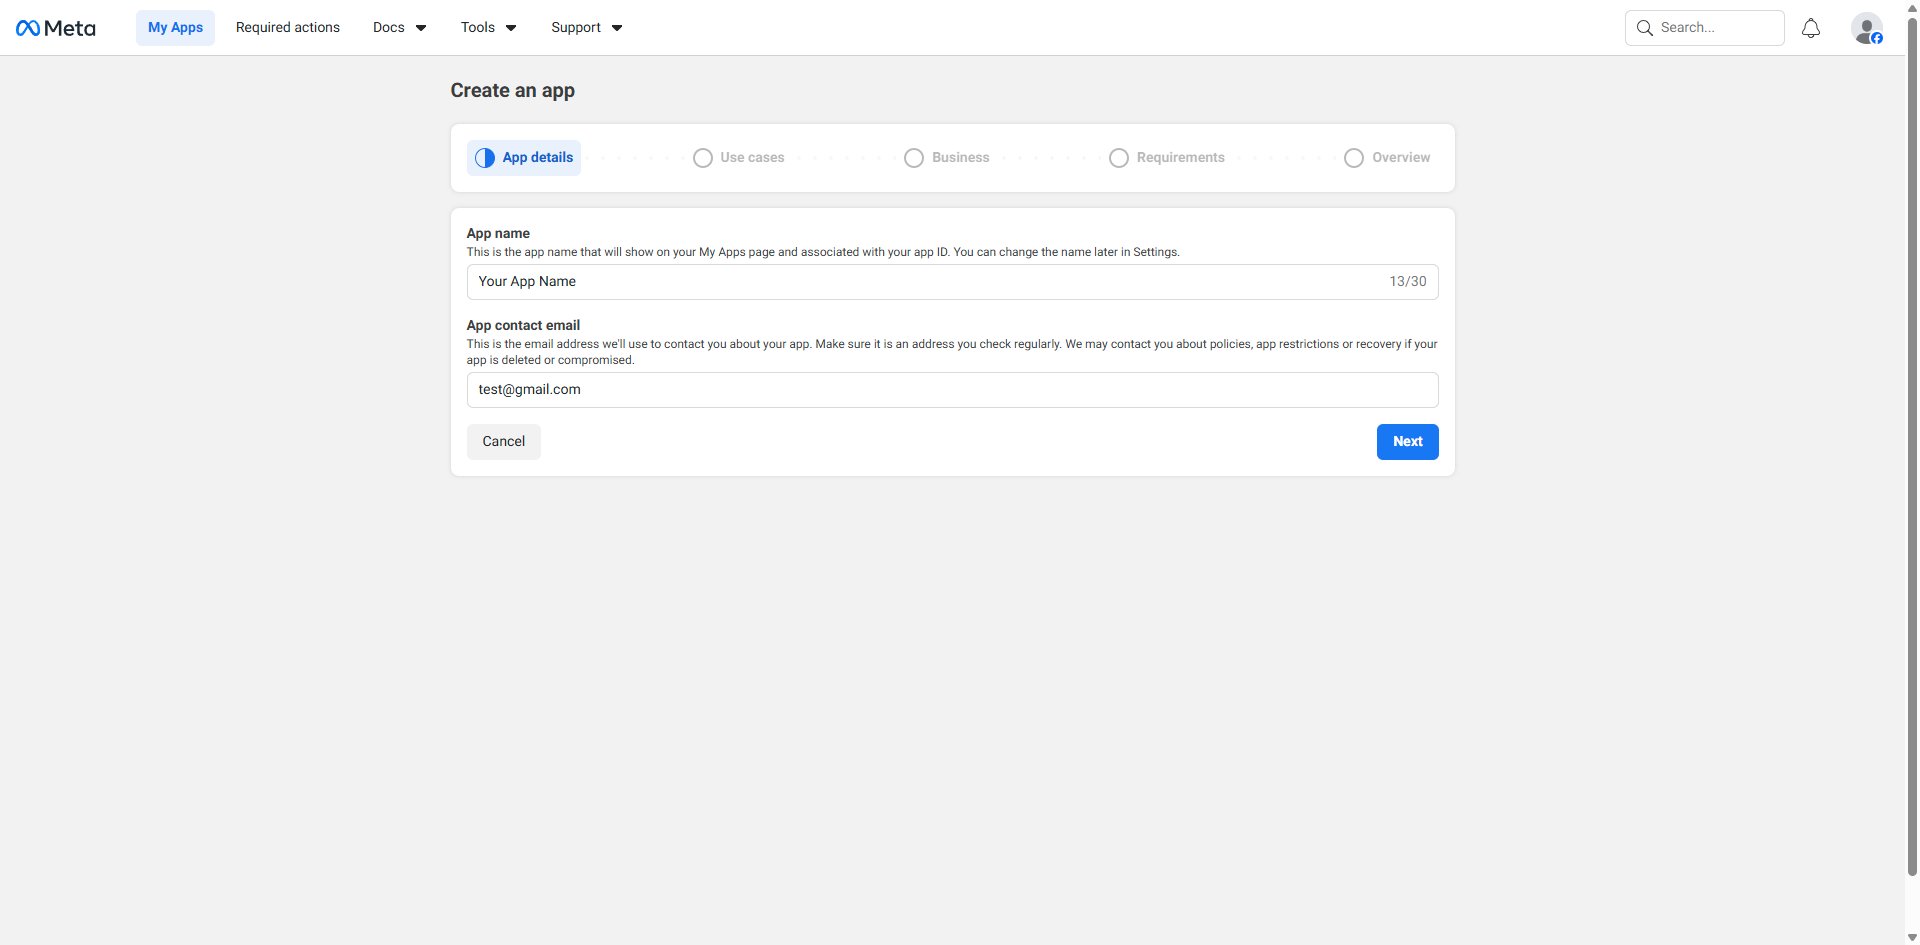
Step 1: Create a Meta Developer App
- Go to developers.facebook.com/apps and log in with your Facebook account
- Click Create App
- Enter your App name and App contact email, then click Next
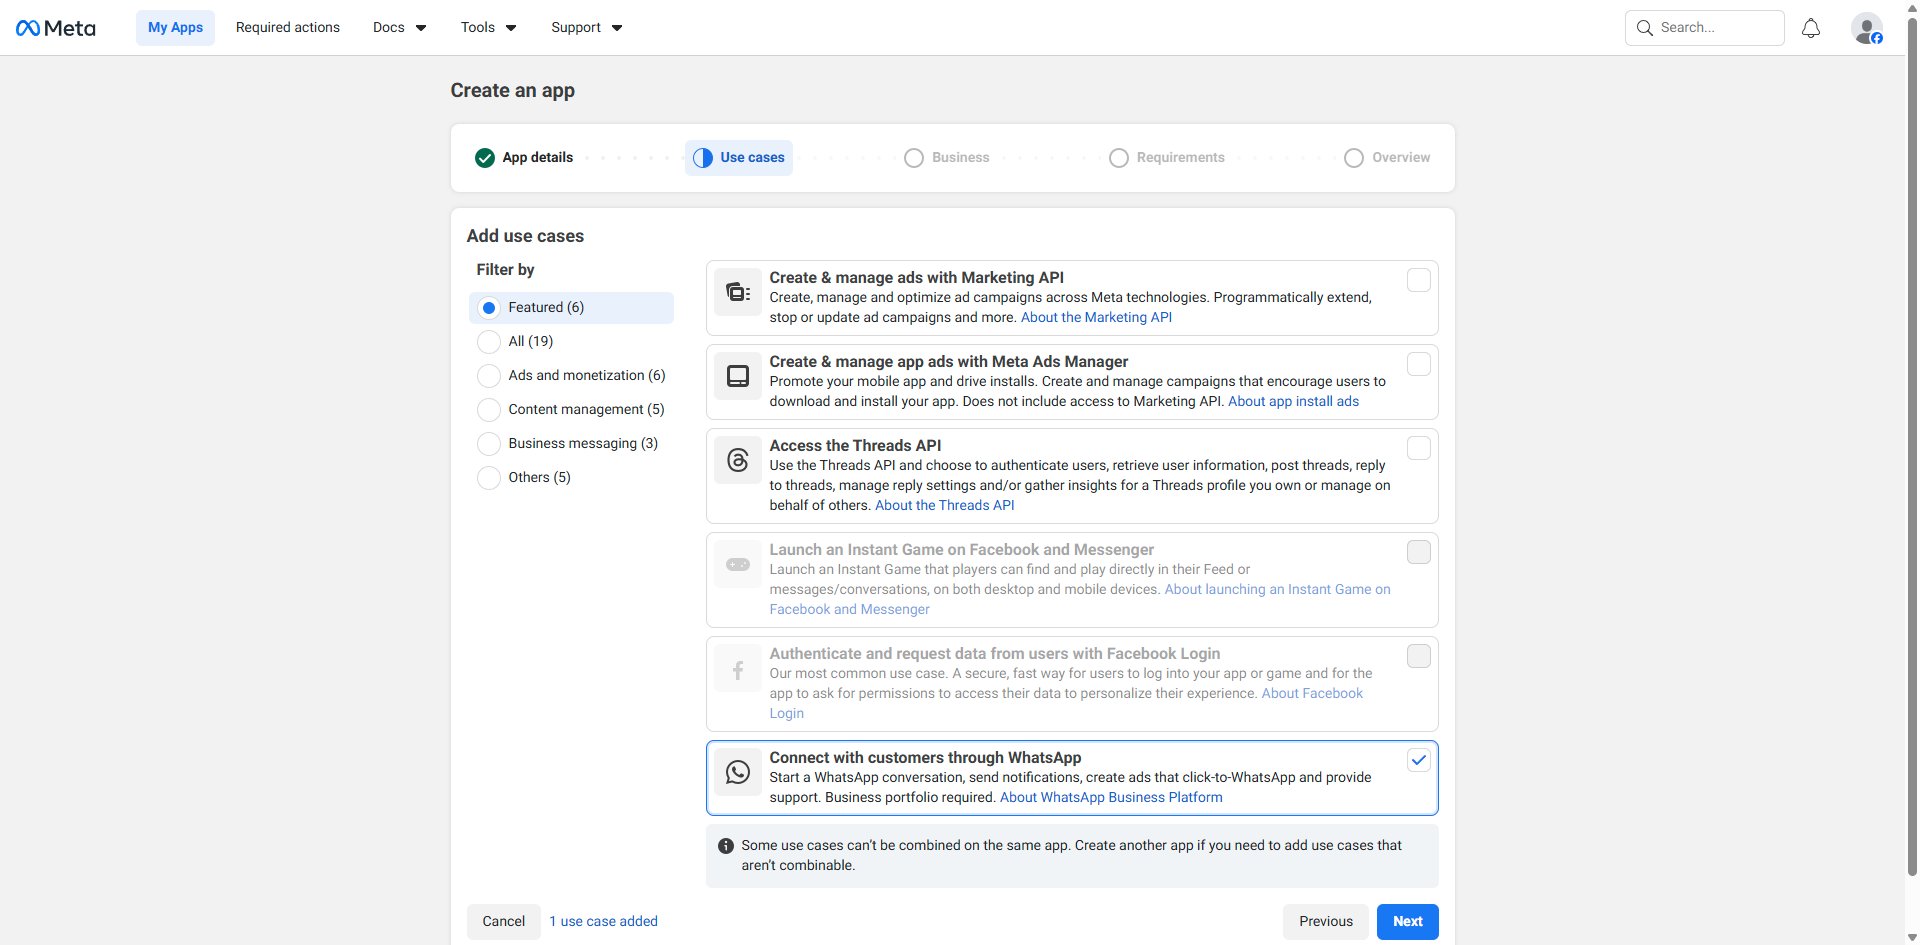
- On the Use cases screen, select Connect with customers through WhatsApp and click Next
- On the Business screen, select your existing business portfolio or click Create a business portfolio to create a new one, then click Next
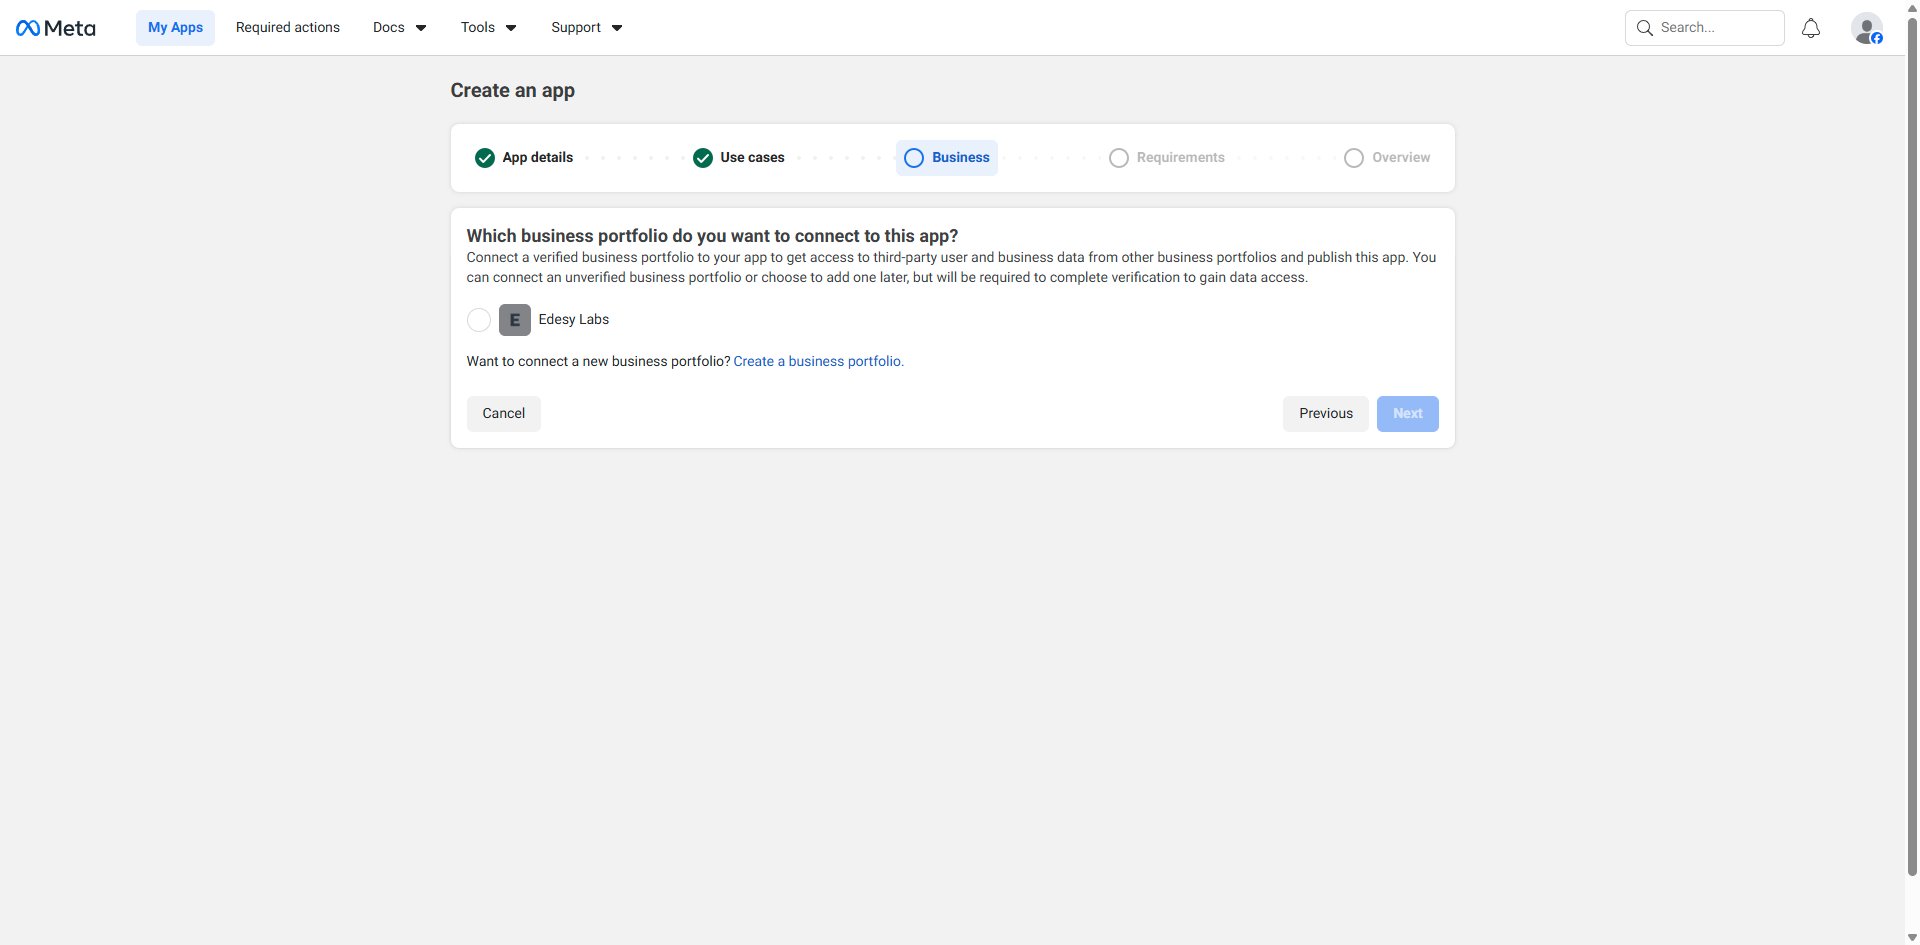
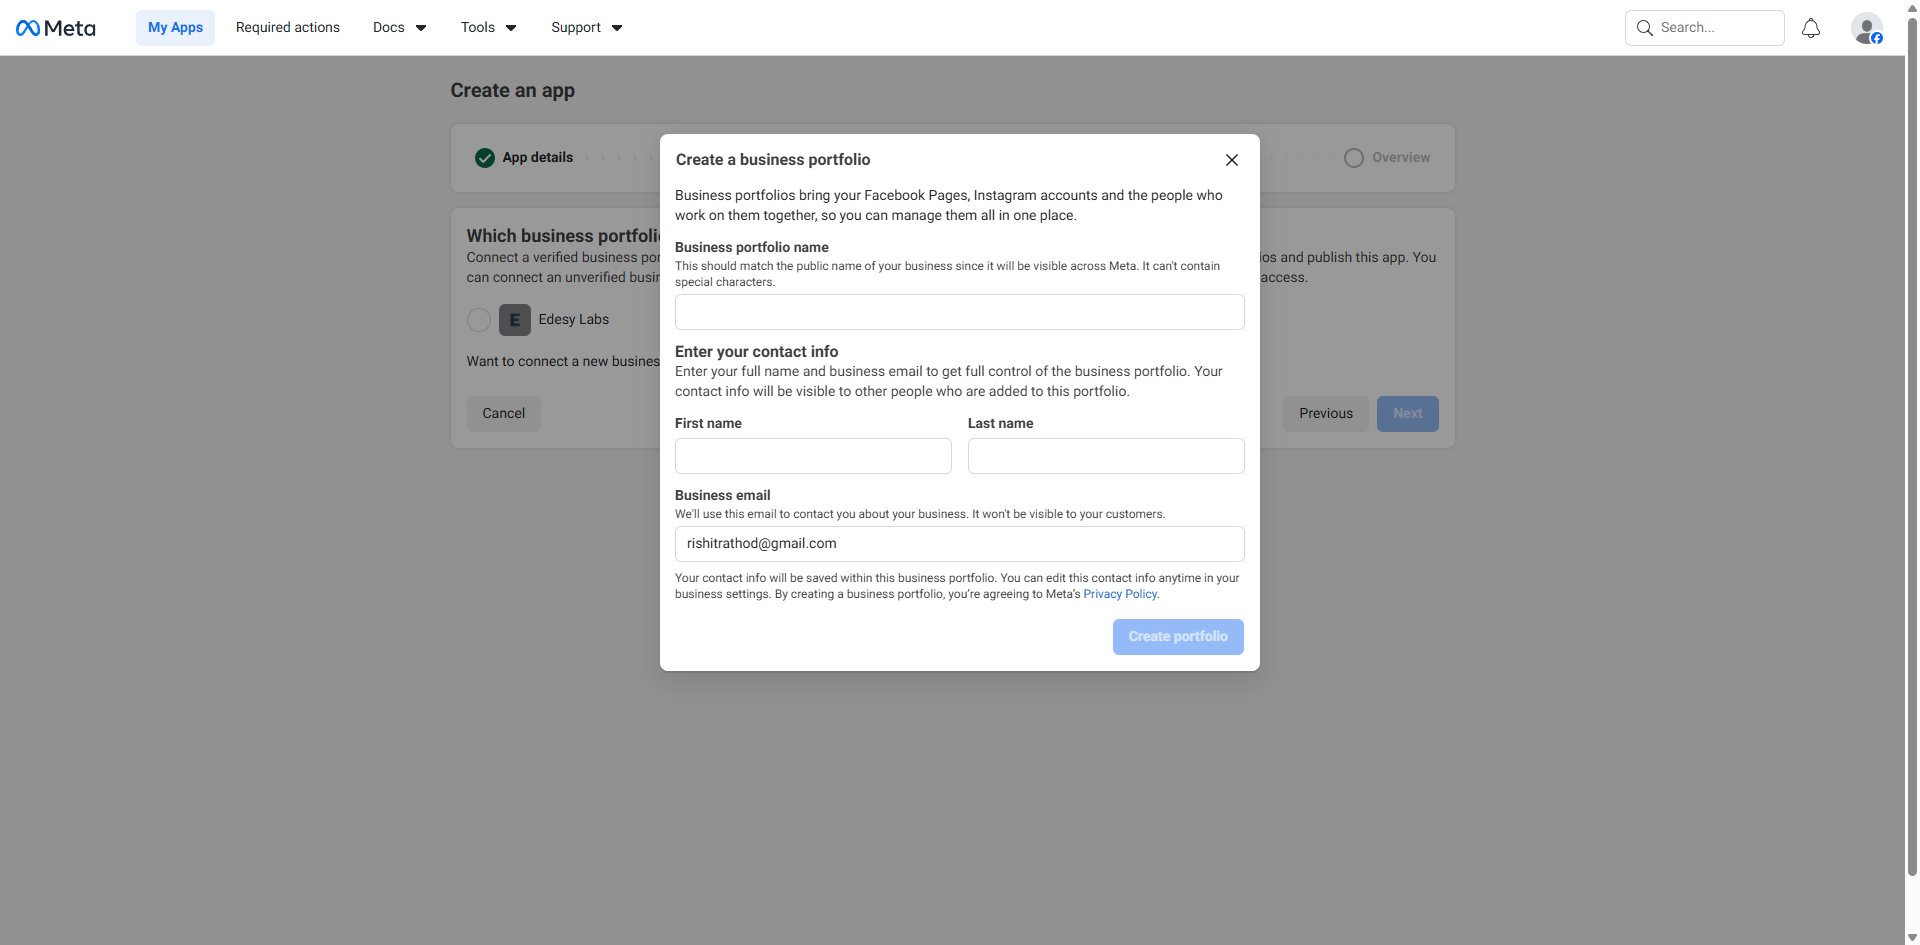
If you create a new portfolio, fill in the basic details in the modal:
- The Requirements screen shows any publishing requirements — at this stage there are usually none. Click Next

- Review your app summary on the Overview screen and click Create app
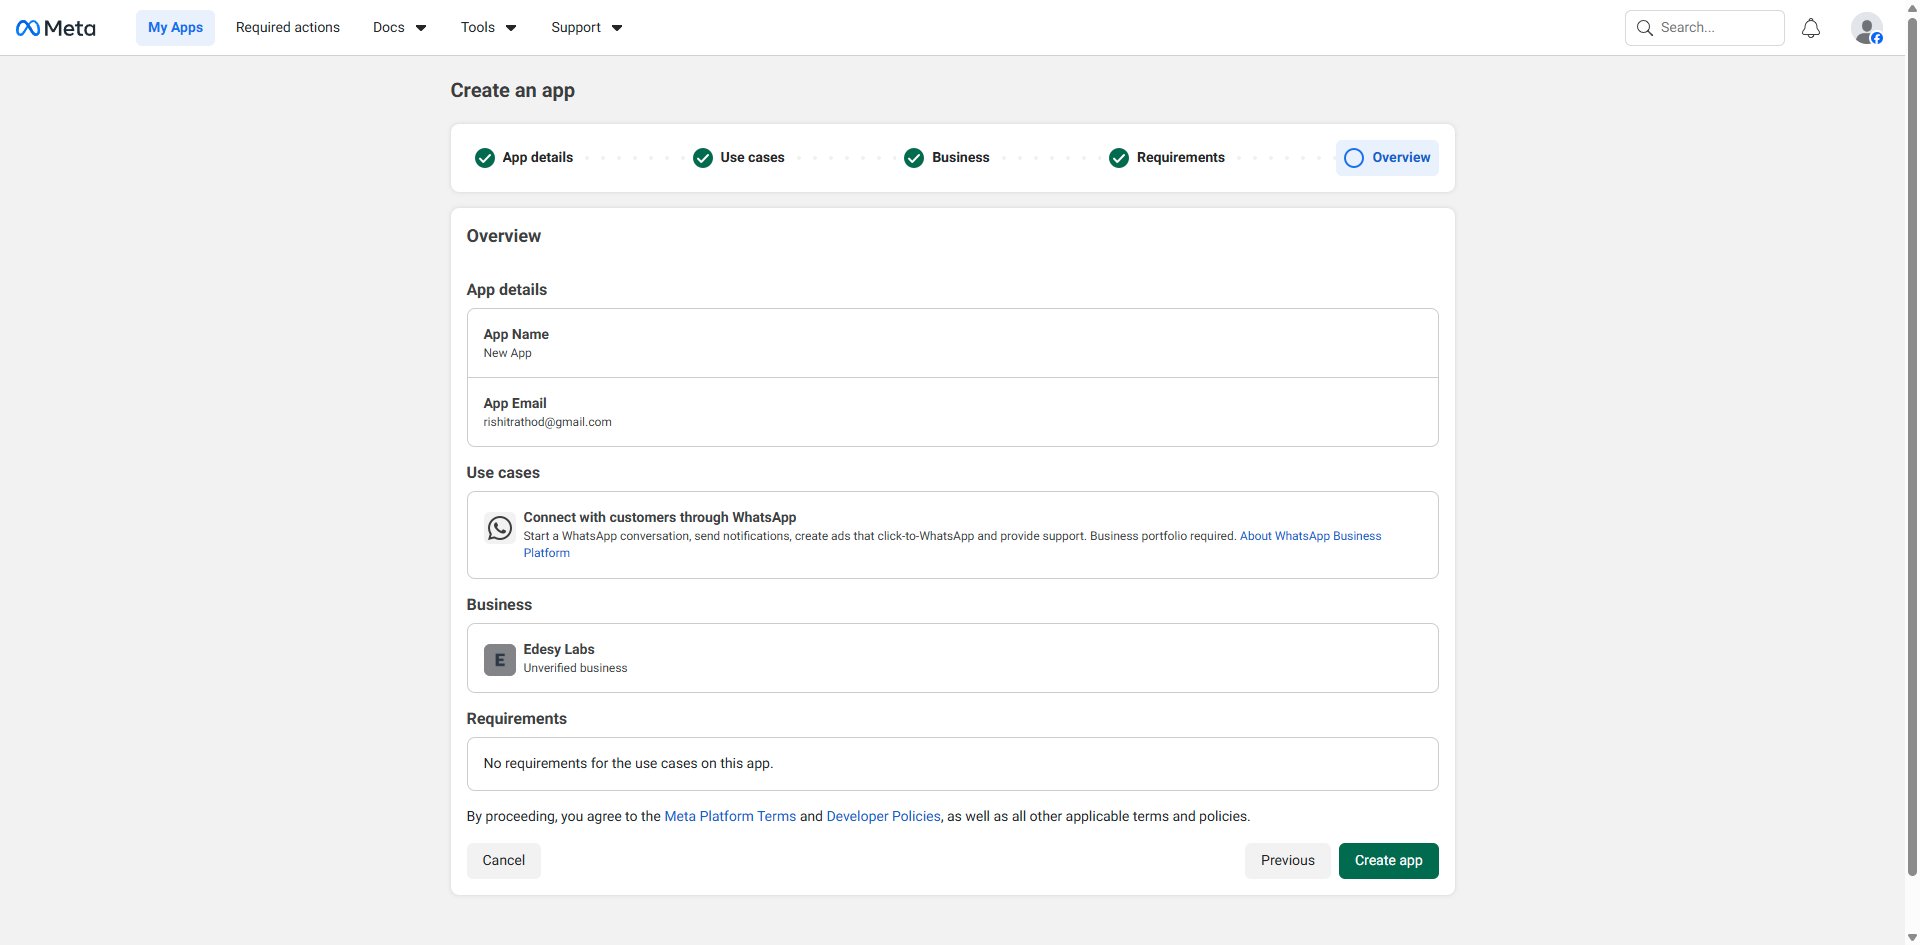
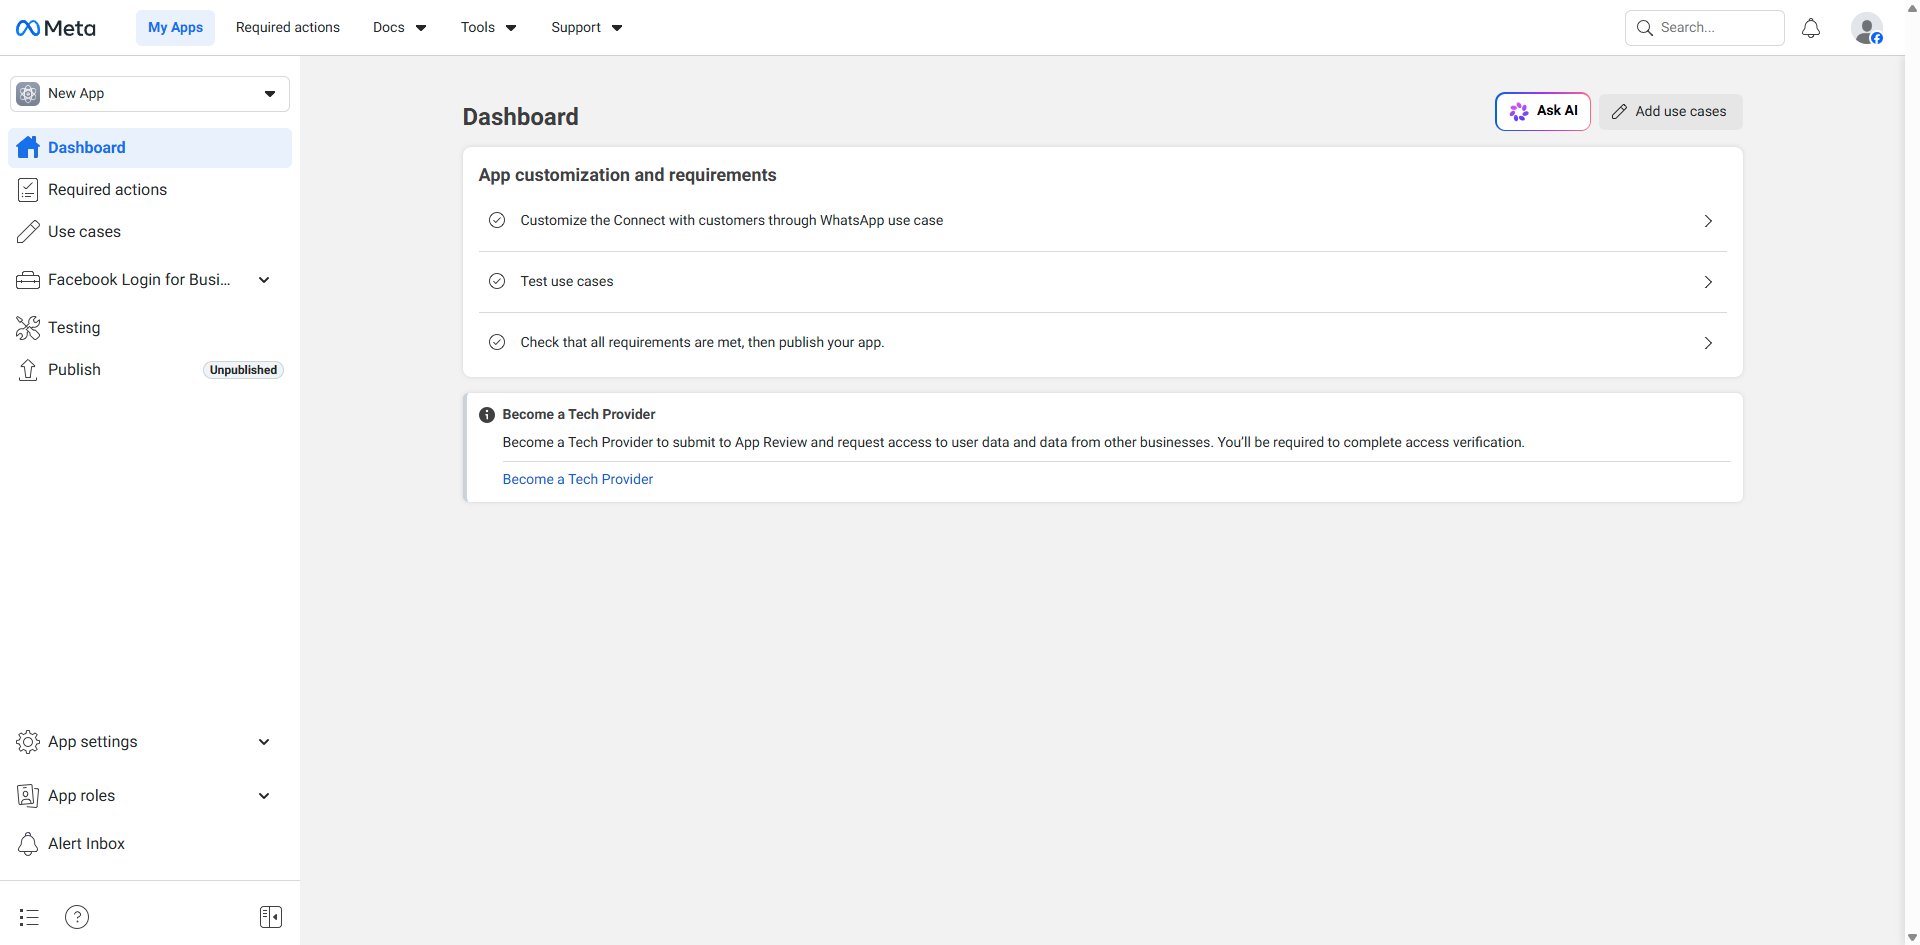
After creation you are redirected to the app Dashboard, which shows your app customization checklist.
Step 2: Find Your Phone Number ID and WABA ID
Navigate to Use cases in the left sidebar. Click the Customize button on the Connect with customers through WhatsApp use case. You'll land on the Overview page showing the guided 3-step setup flow.
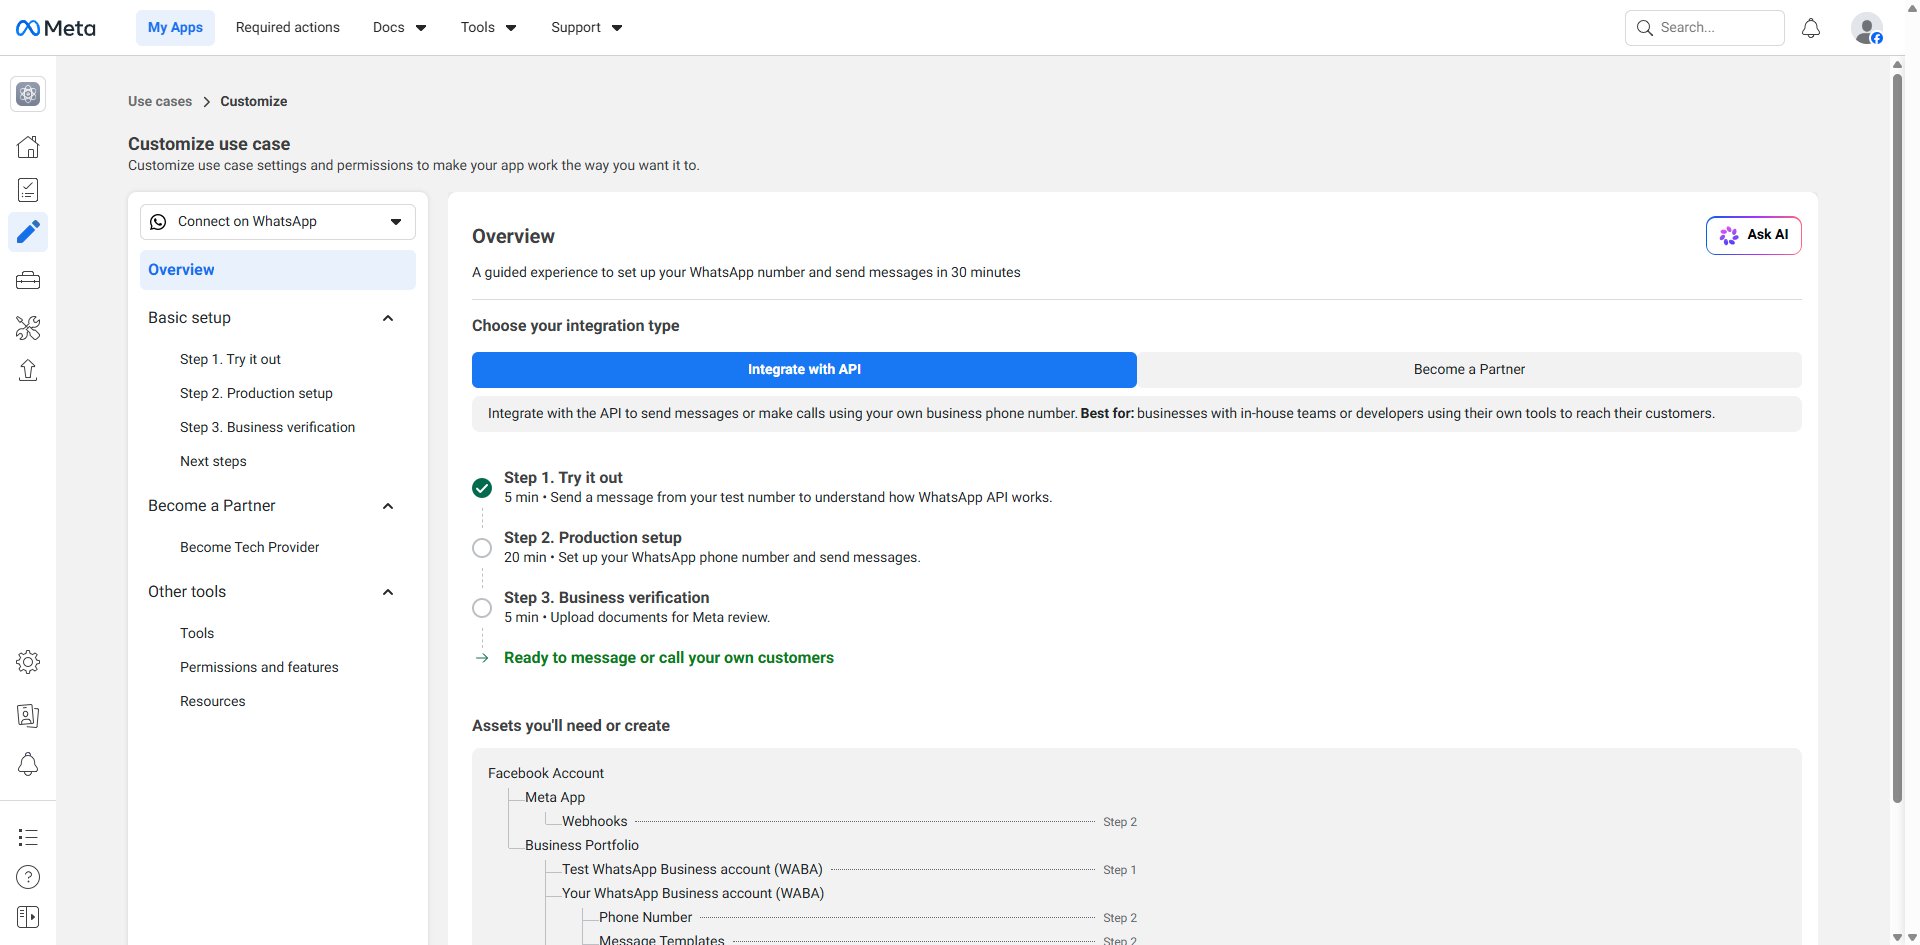
Click Step 1. Try it out in the left sidebar. You'll see your automatically created test number with two important IDs:
- Phone Number ID — shown next to your test number
- WhatsApp Business Account ID (WABA ID) — shown to the right of the Phone Number ID
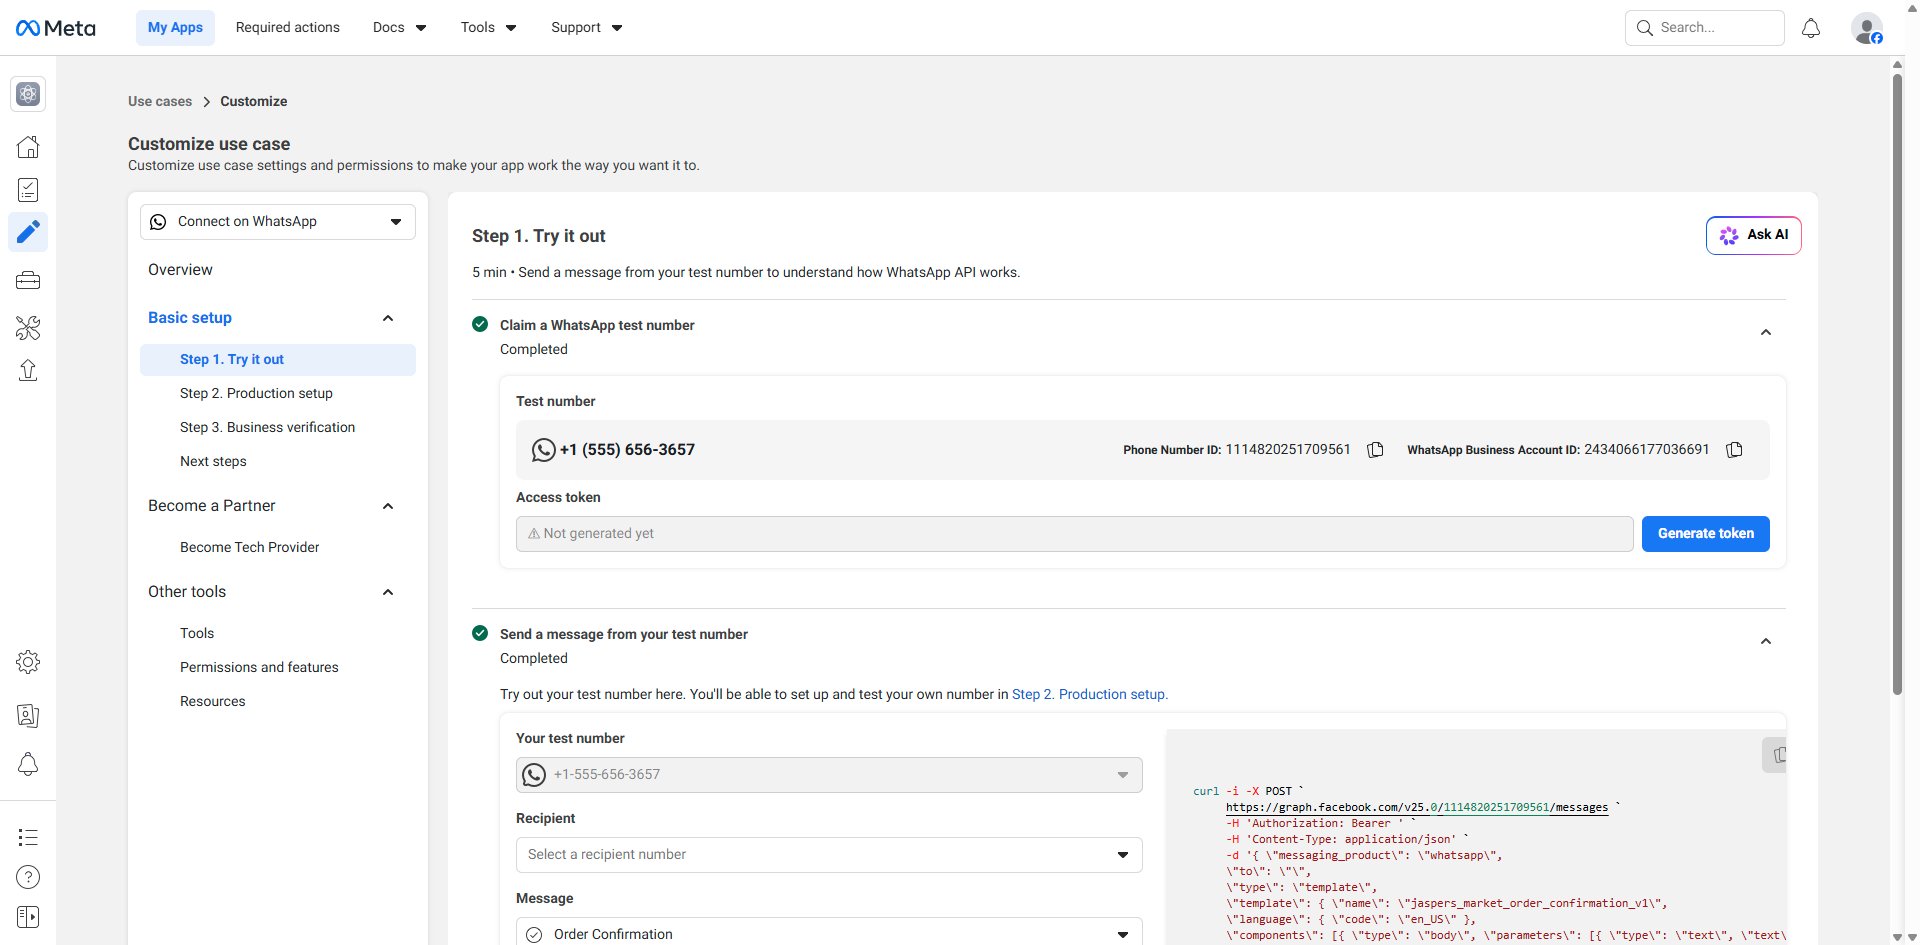
Copy and save both of these — you'll need them later.
Using your own number instead of the test number? Go to Step 2. Production setup → Register your WhatsApp phone number and follow the OTP verification steps.
Step 3: Generate a Permanent Access Token
The Generate token button on the Step 1 page creates a temporary token that expires quickly. For production use, generate a permanent token via a System User.
3a. Create a System User
- Go to business.facebook.com/latest/settings → click System users under the Users section in the sidebar
- Click + Add in the top-right corner → give the system user a name → set role to Admin → click Create System User
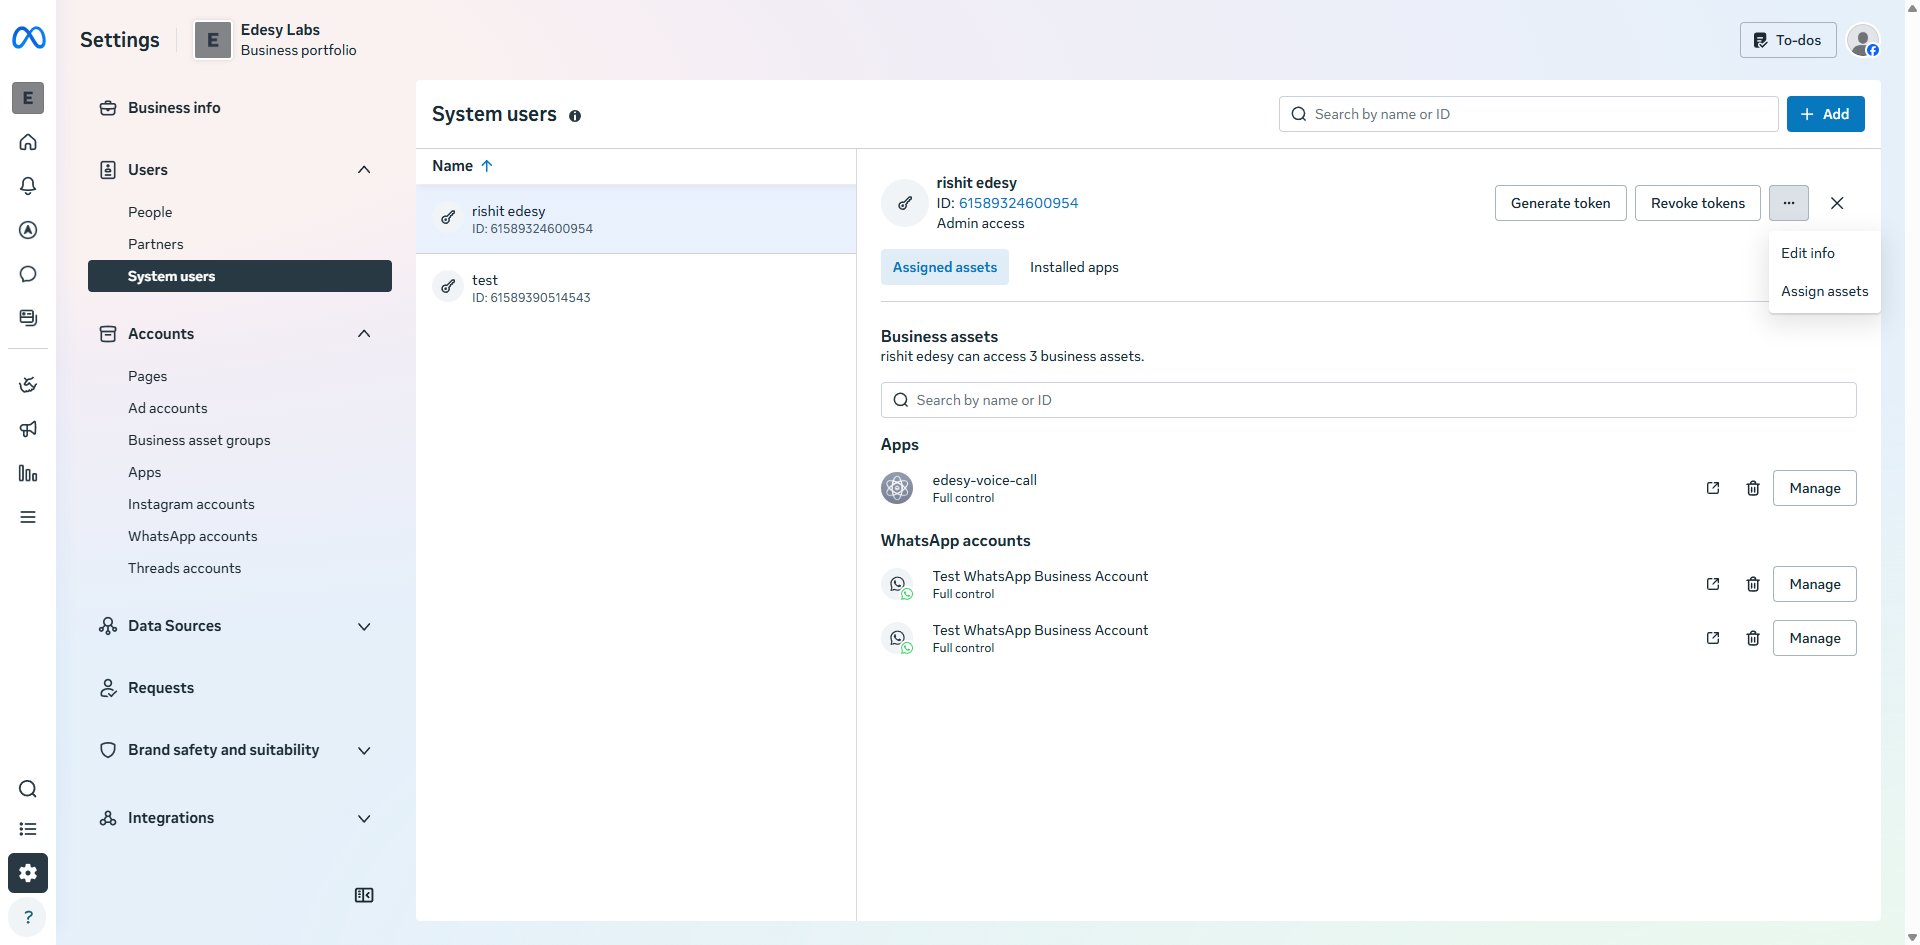
3b. Assign Assets to the System User
- Select the new system user → click the ⋯ menu → click Assign assets
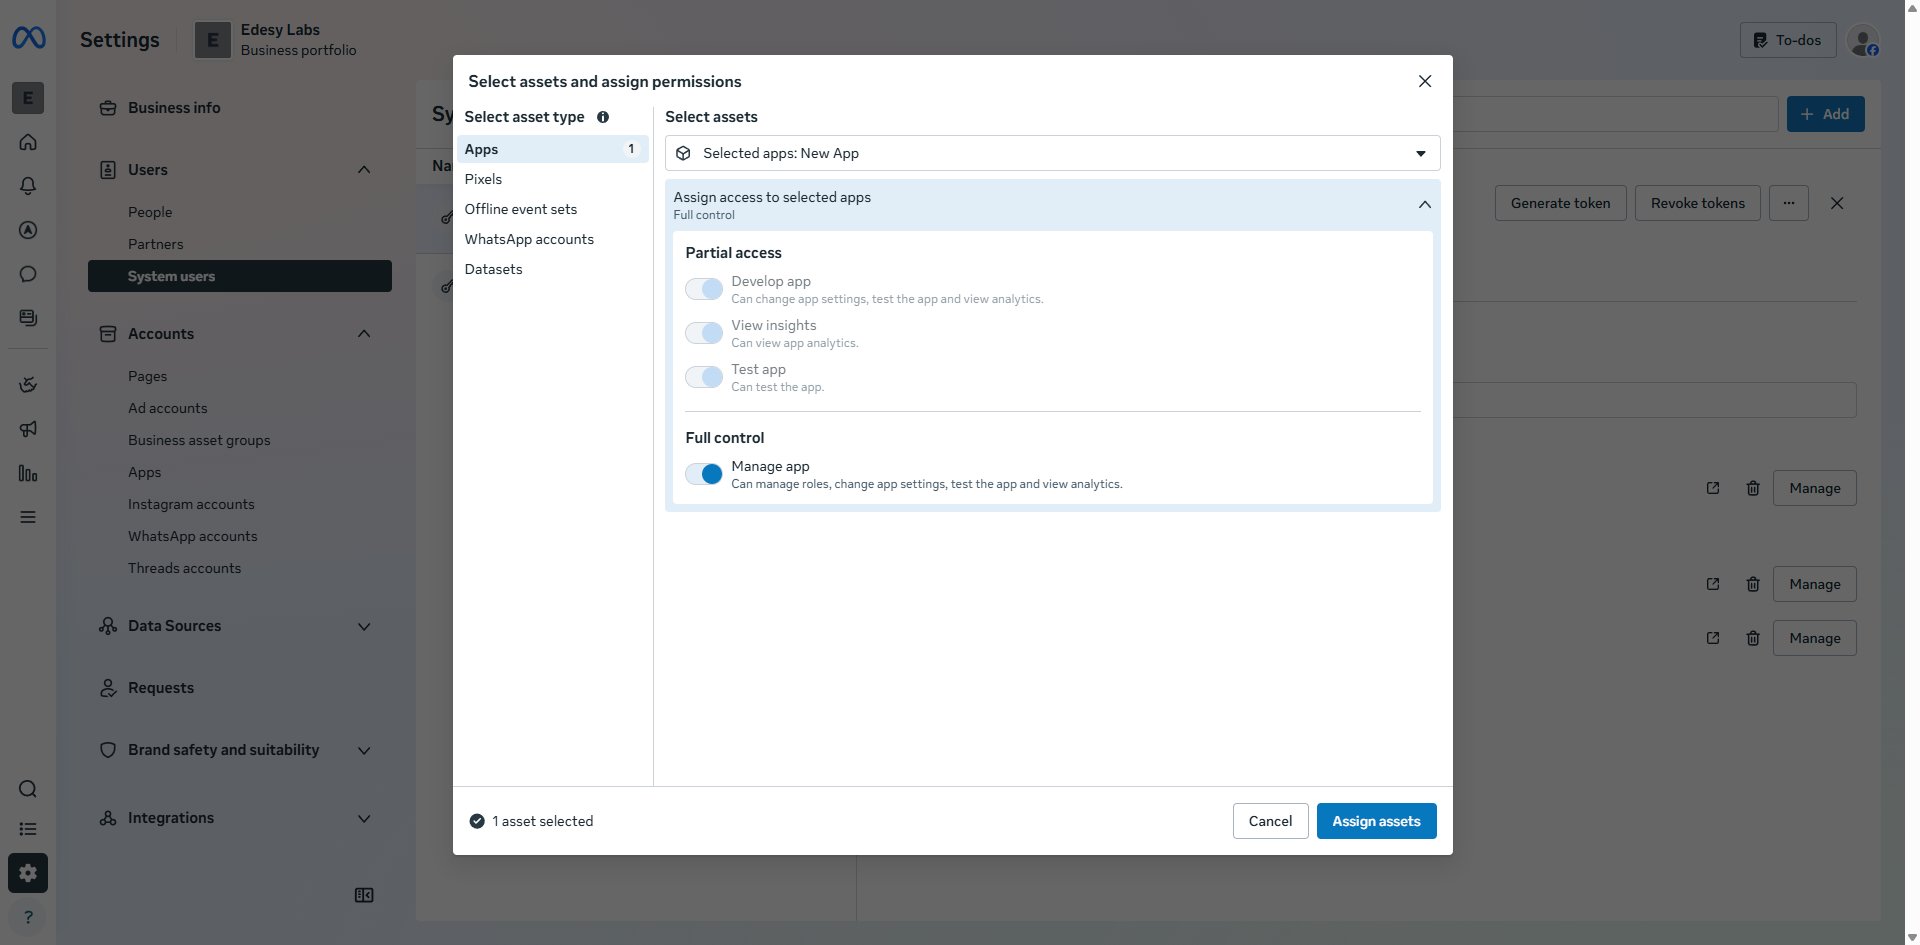
- In the Select assets and assign permissions modal, click Apps on the left, select your app, then enable Manage app under Full control, and click Assign assets
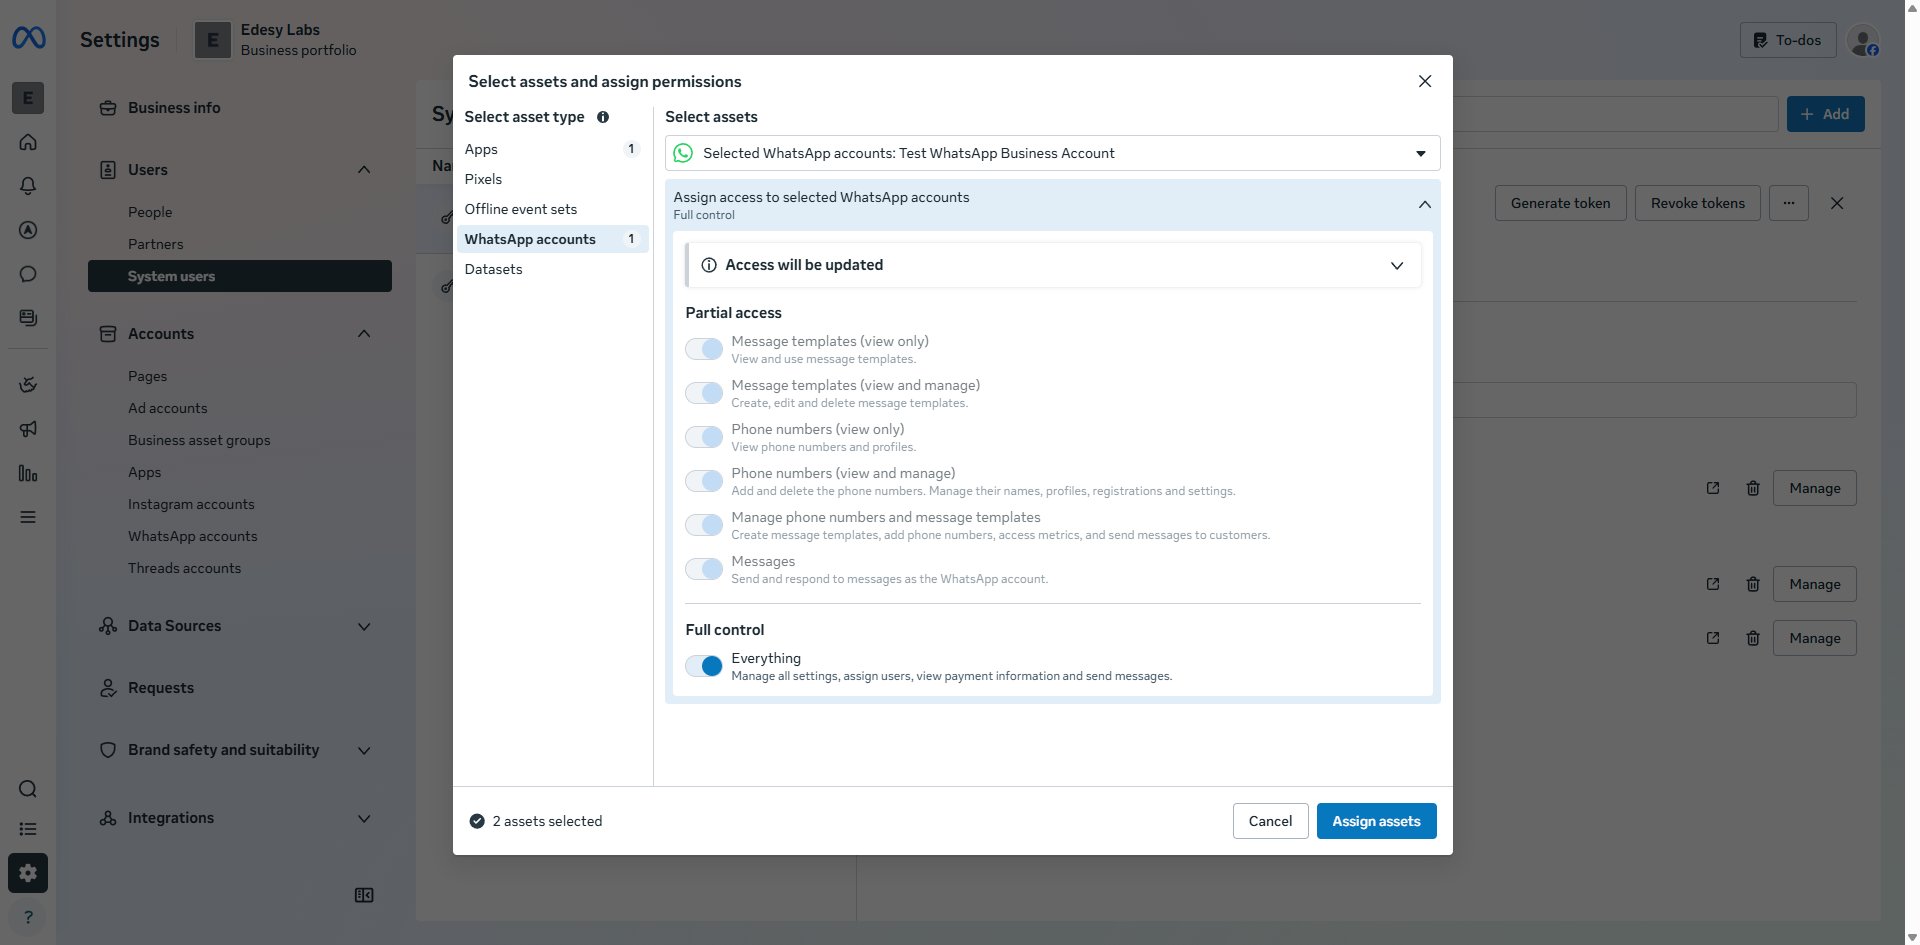
- Open Assign assets again, this time click WhatsApp accounts on the left, select your WABA, then enable Everything under Full control, and click Assign assets
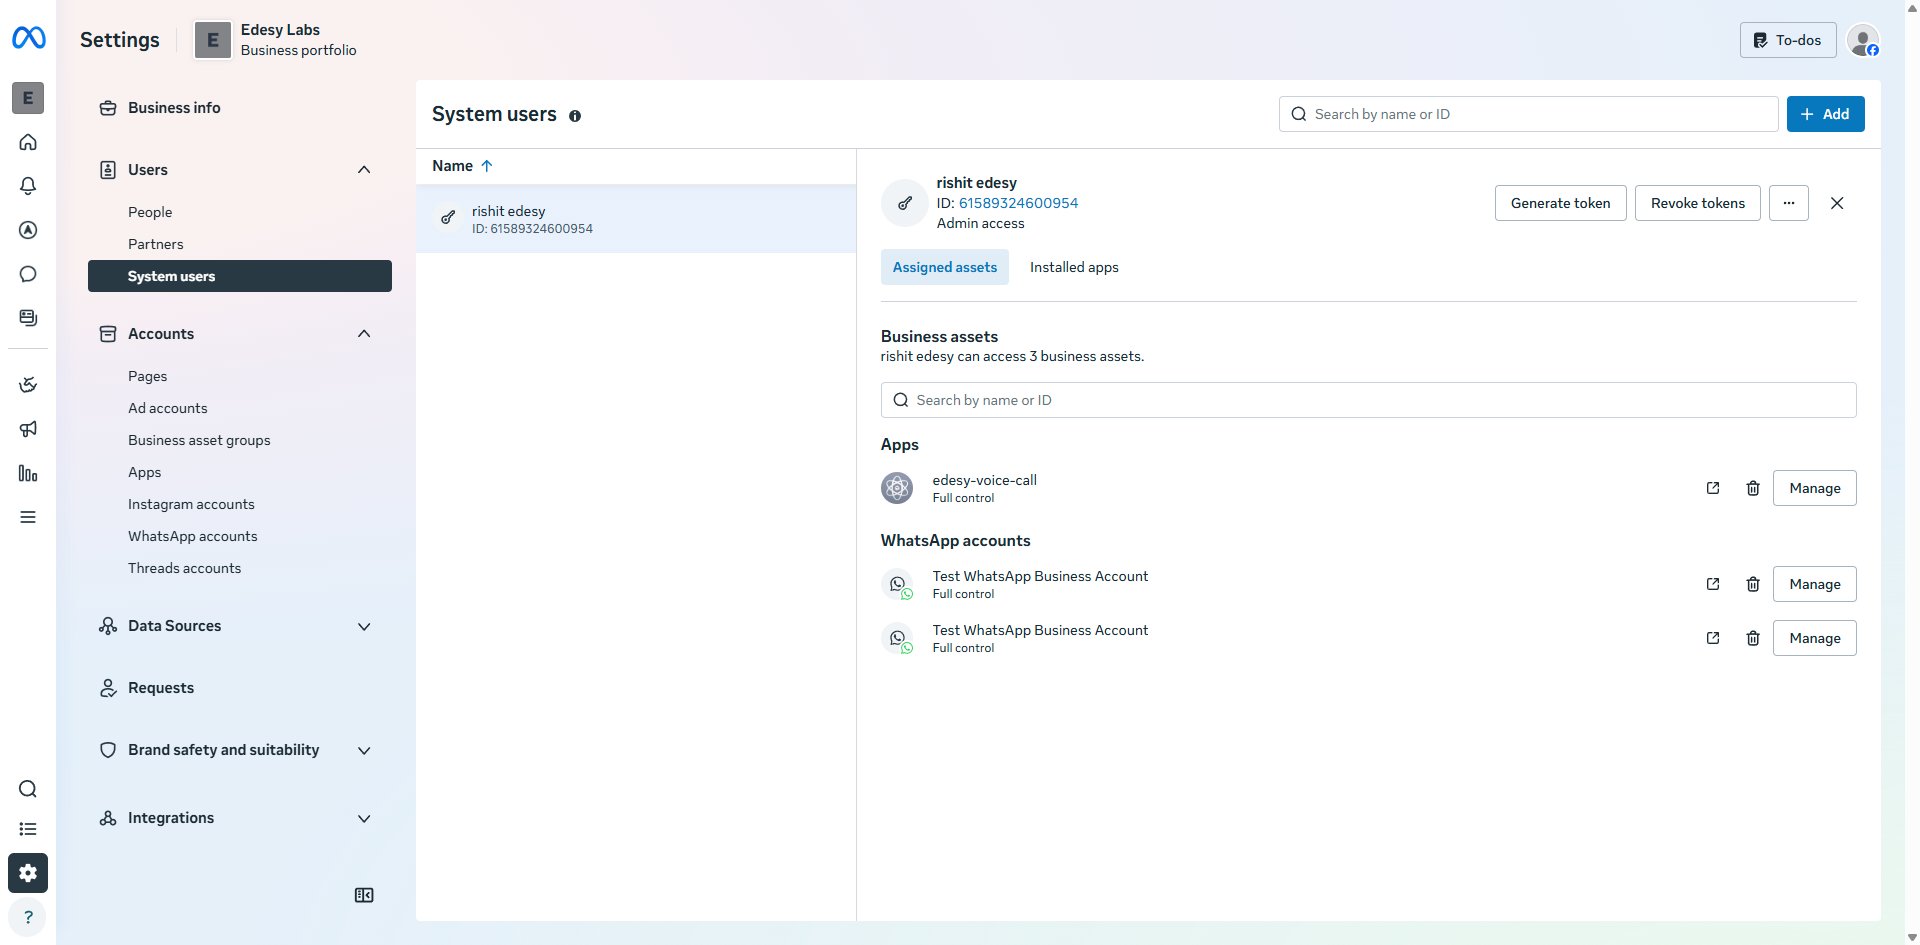
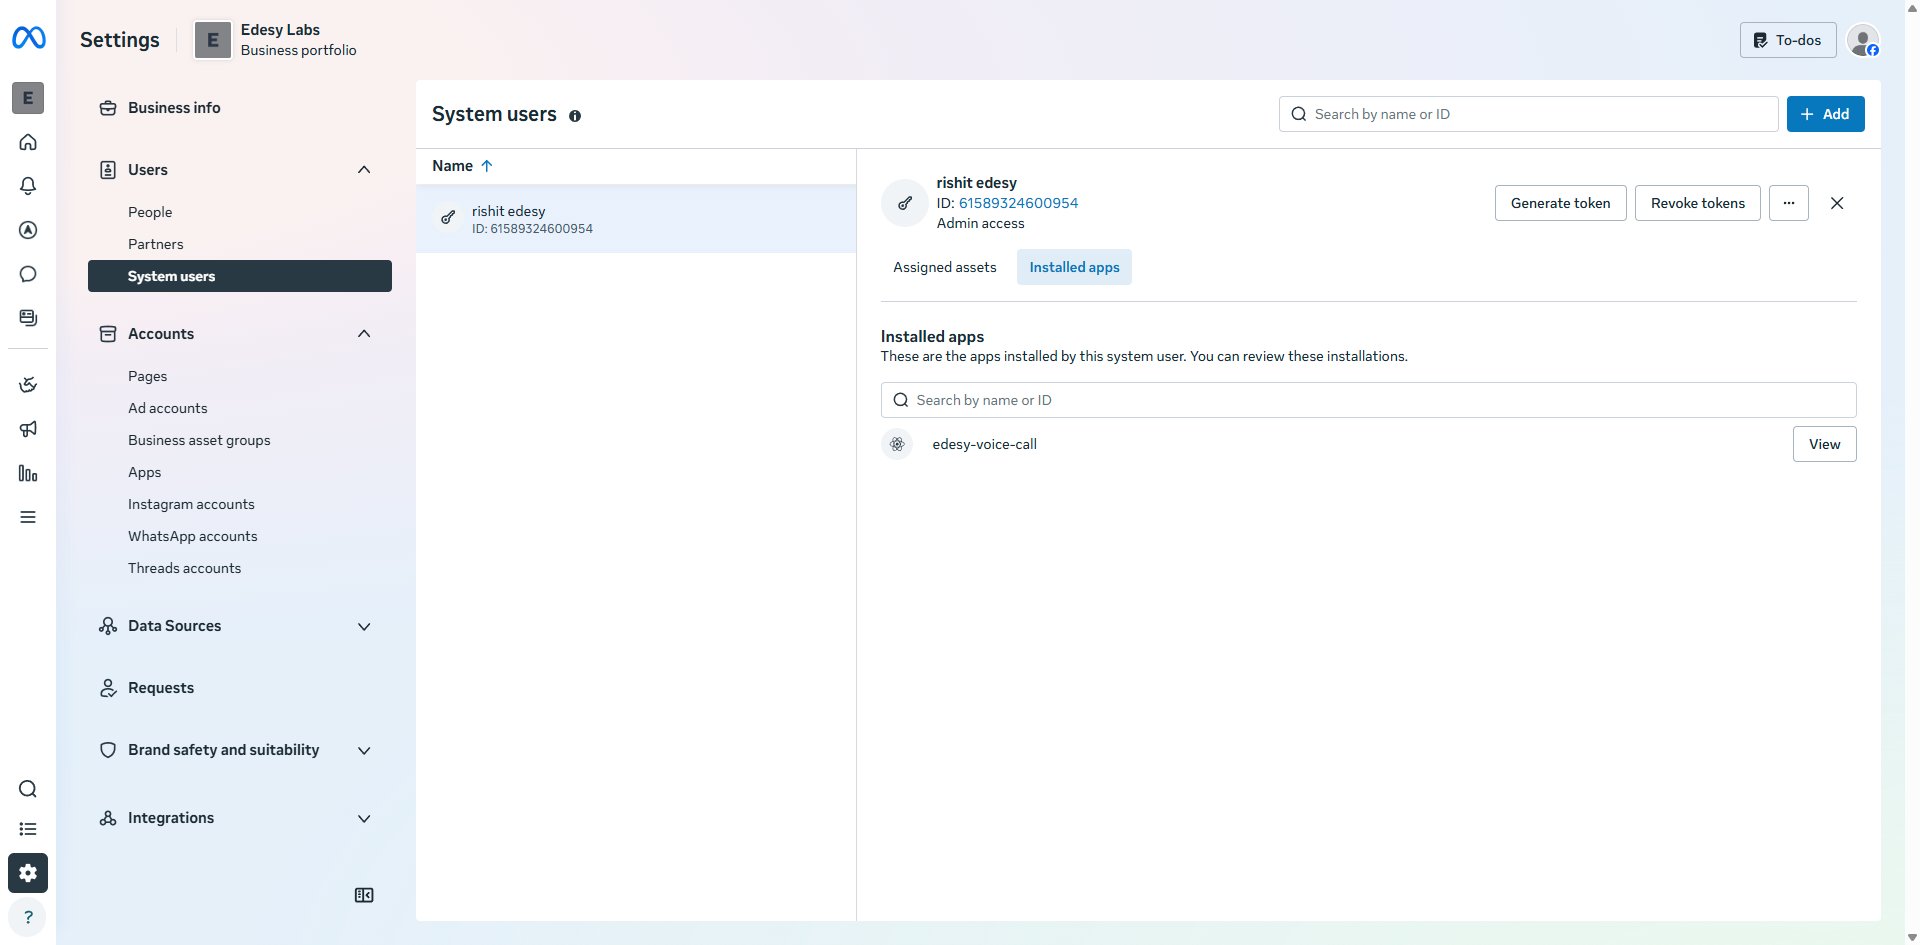
You should now see both the app and the WhatsApp account listed under the system user's Assigned assets tab. You may need to refresh the page to see updated data.
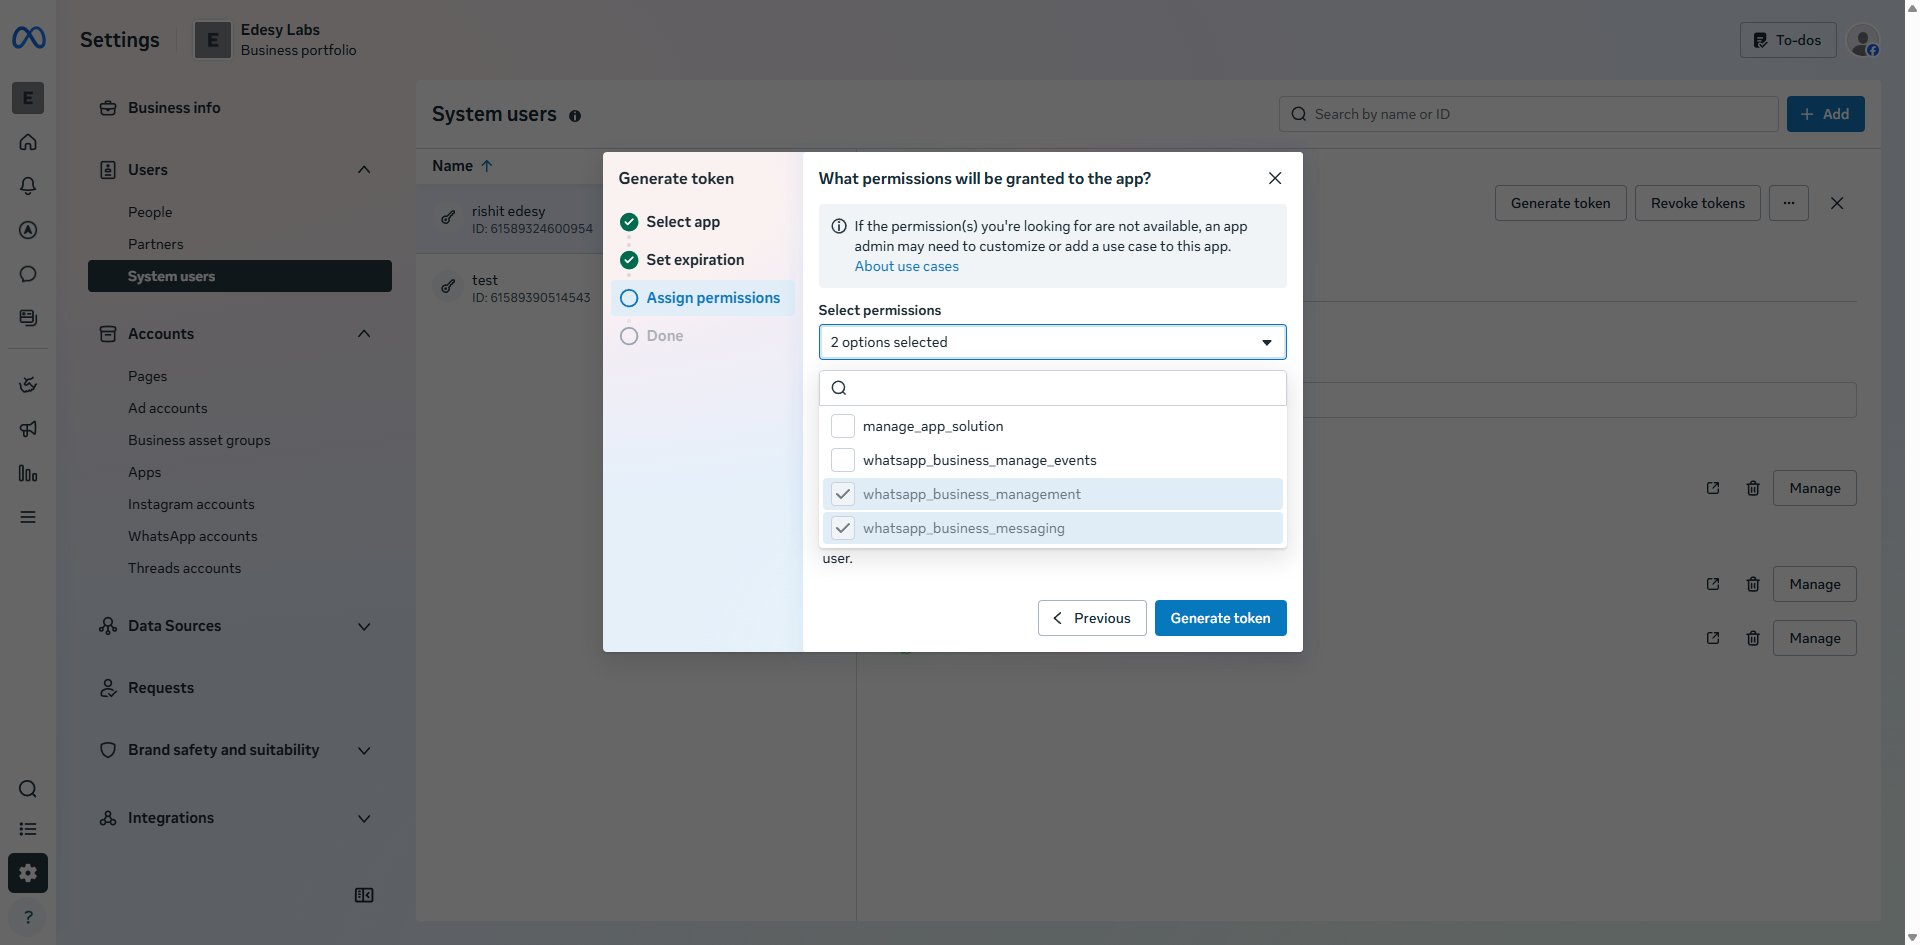
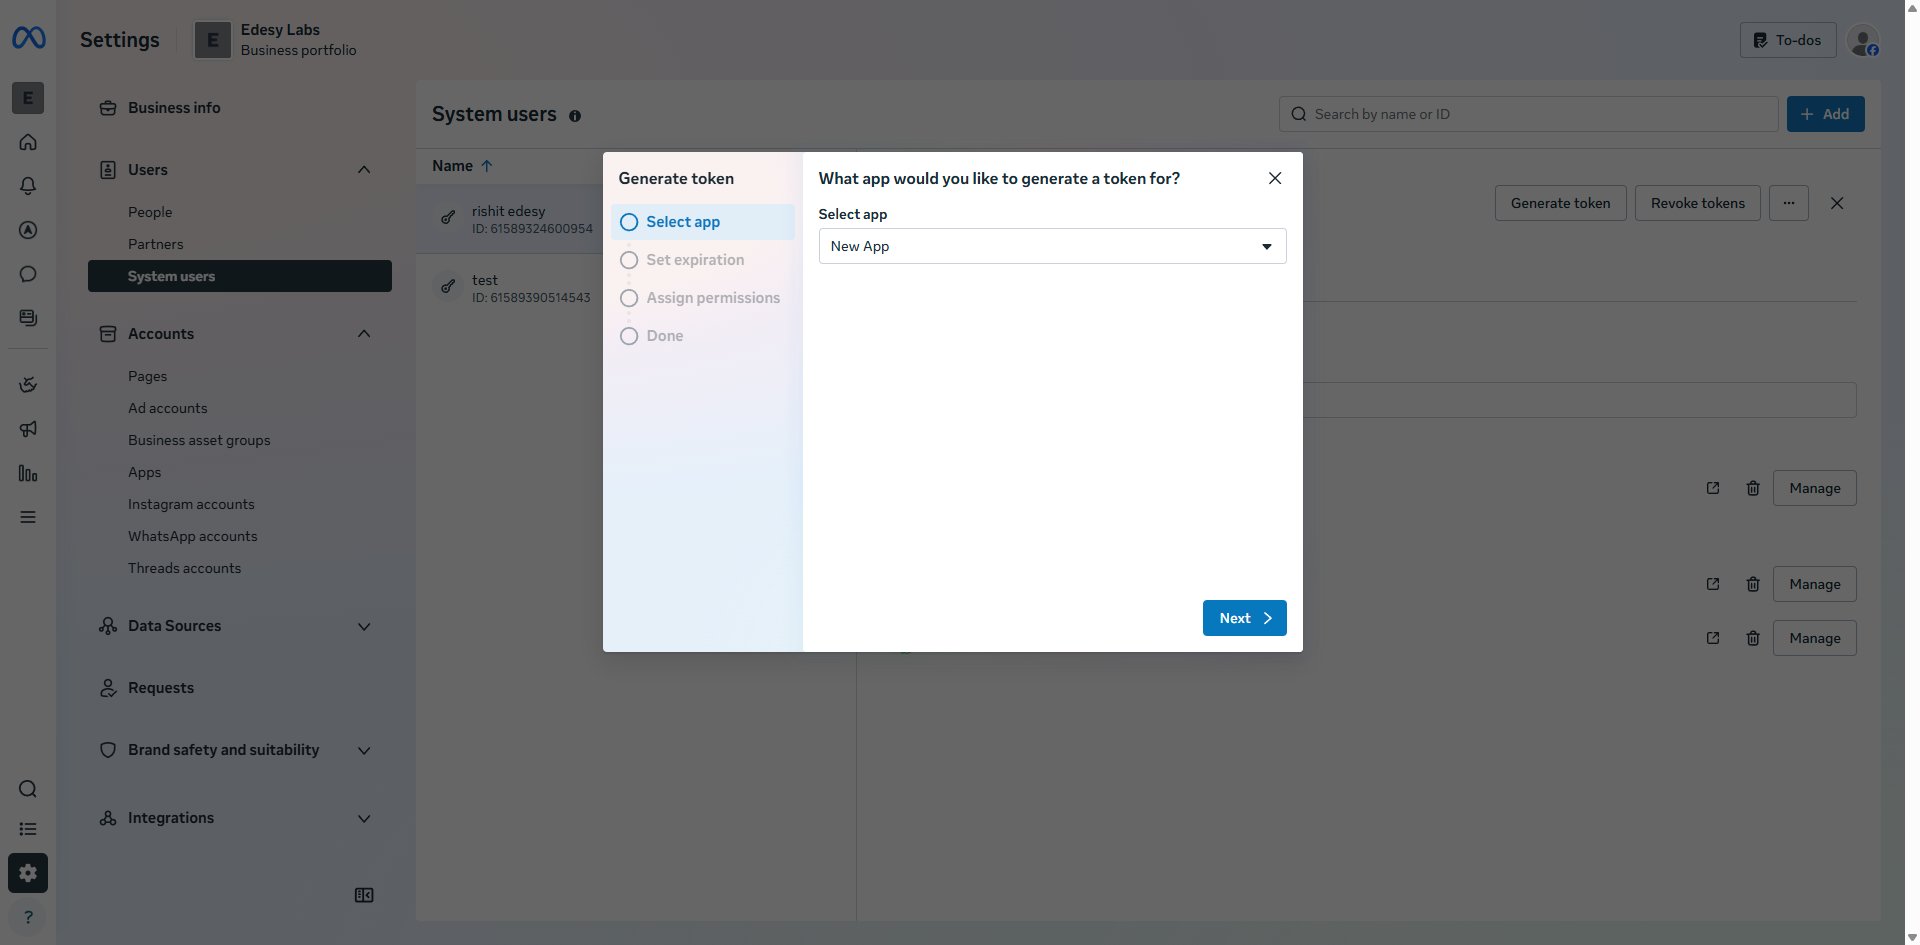
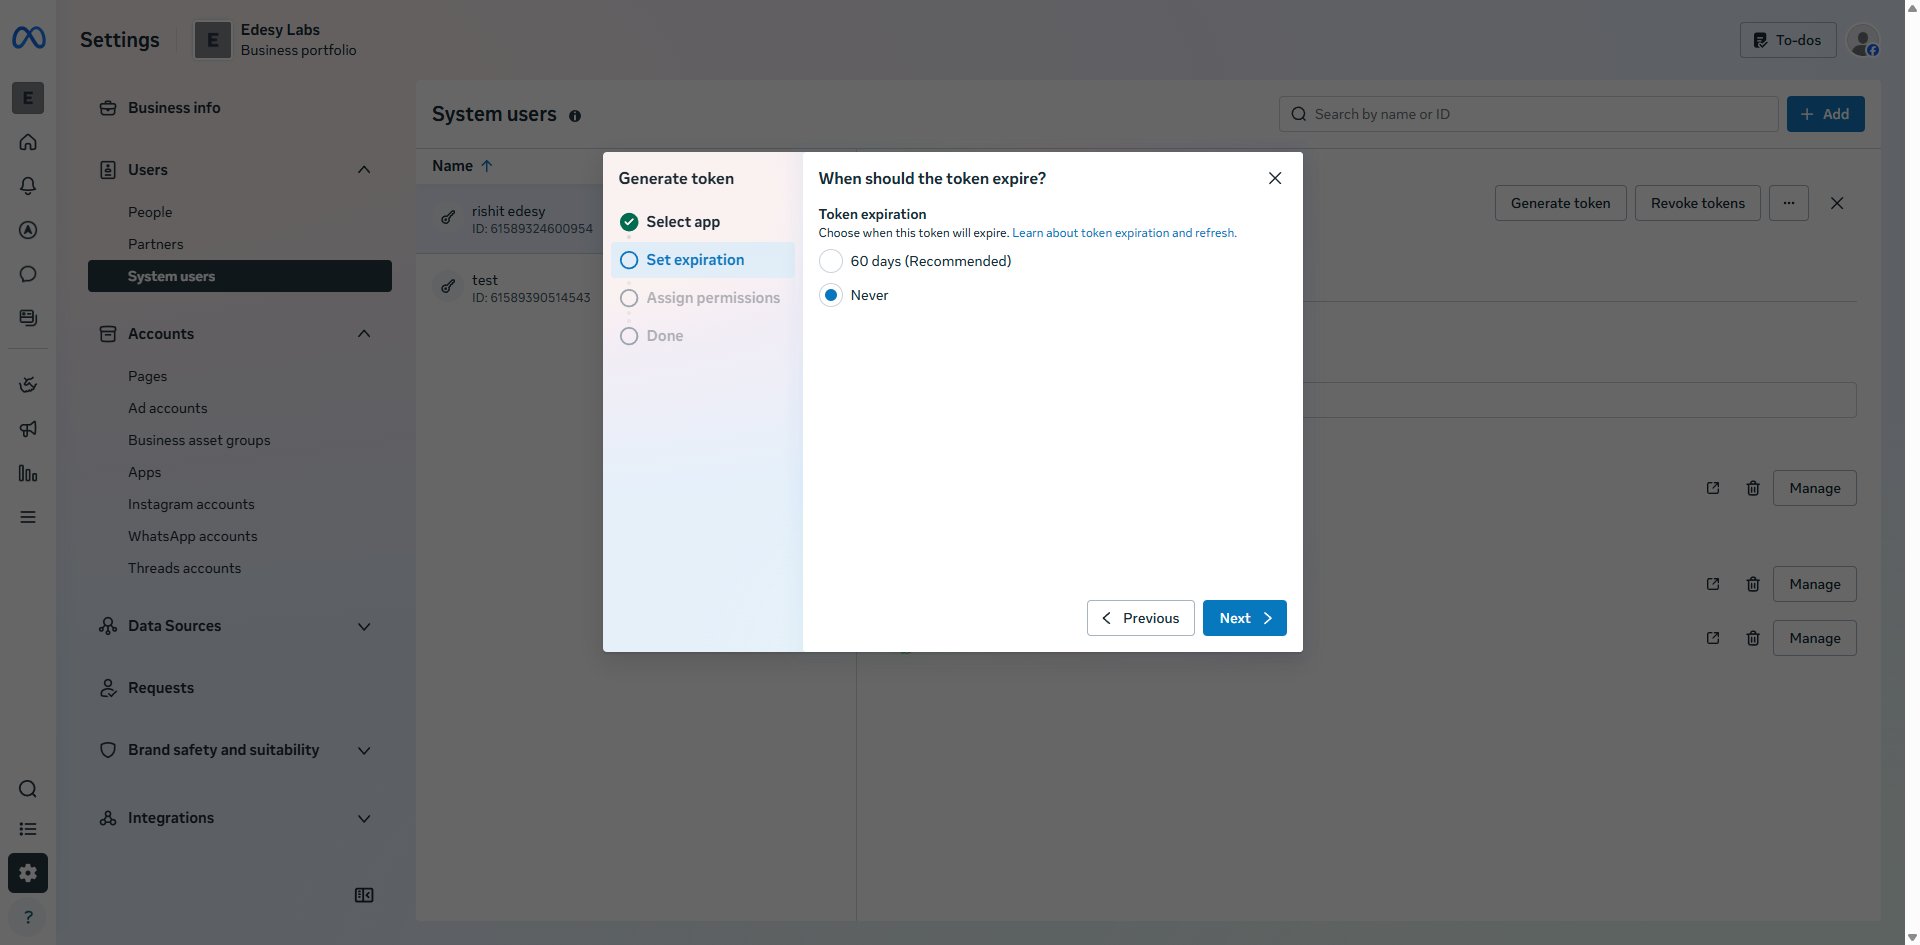
3c. Generate the Token
- Click Generate token on the system user panel
- Select app — choose your app from the dropdown, then click Next
- Set expiration — select Never so the token does not expire, then click Next
- Assign permissions — check both of the following, then click Generate token:
whatsapp_business_managementwhatsapp_business_messaging
- Copy the token shown and store it securely — you will not be able to see it again.
You can verify the app is correctly linked by checking the Installed apps tab on the system user:
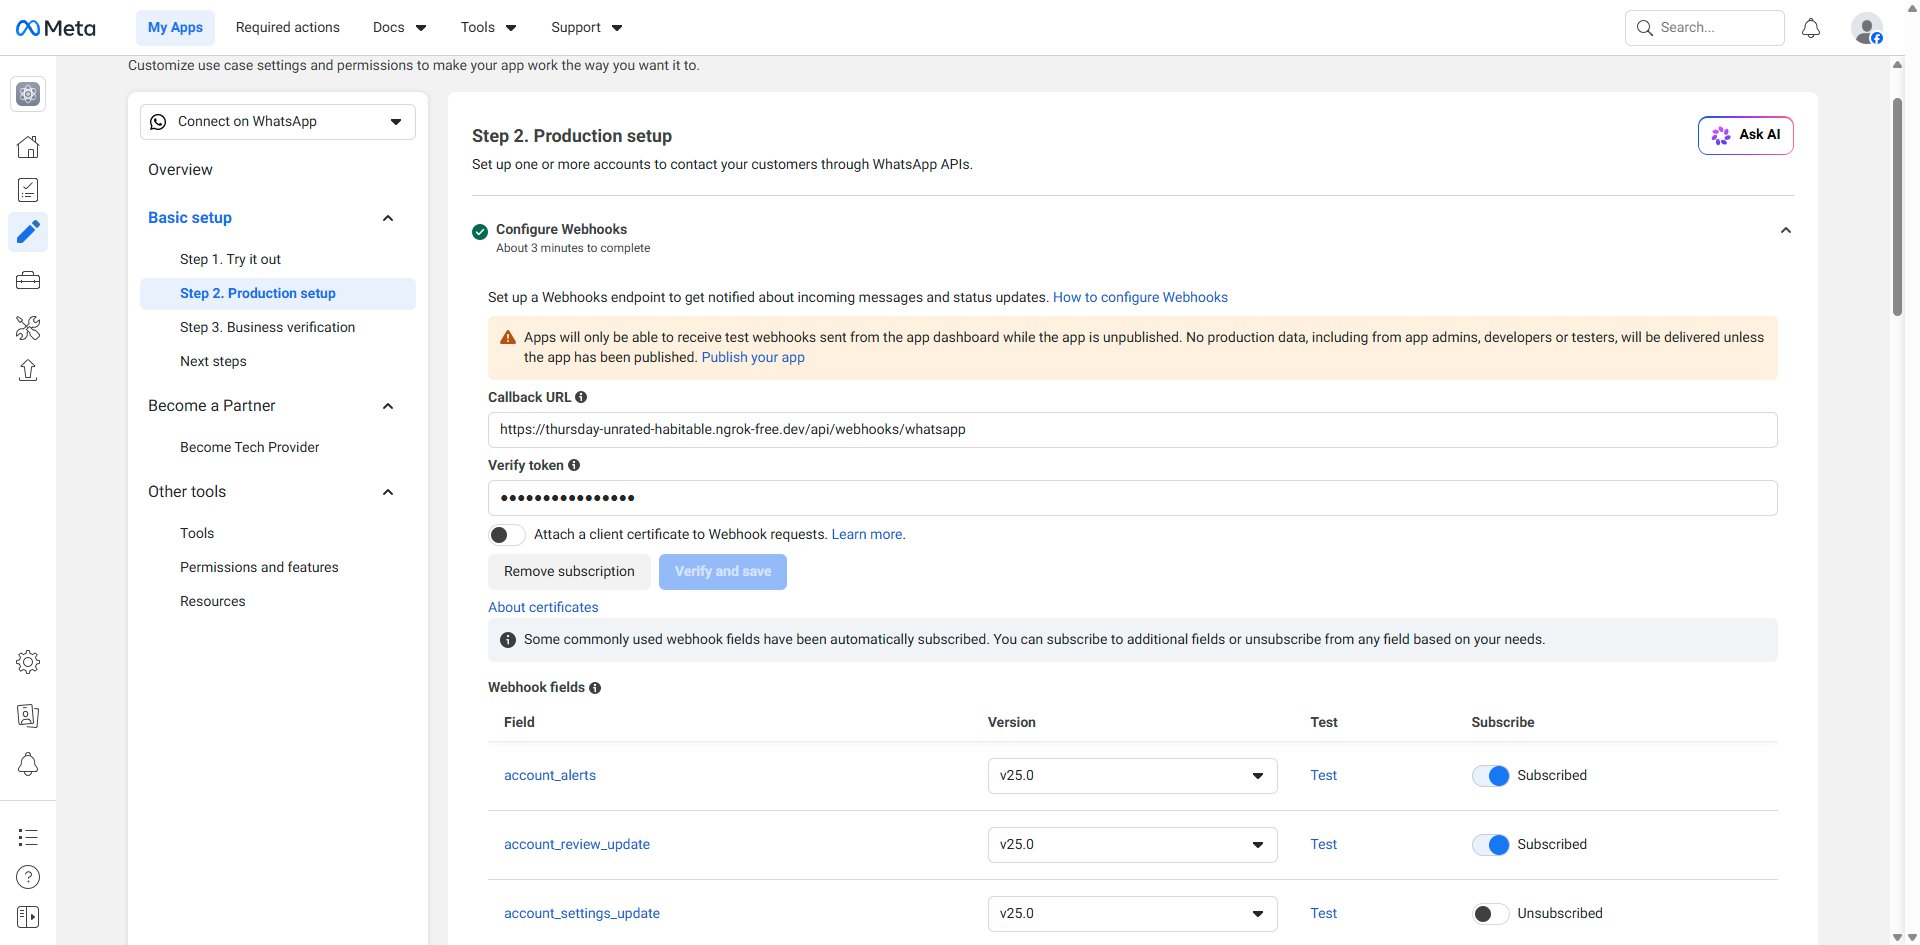
Step 4: Configure Webhooks
-
In your app dashboard, go to Use cases → Customize → Step 2. Production setup
-
Under Configure Webhooks, enter the Callback URL and Verify token
-
Callback URL:
https://voice-agent.edesy.in/api/webhooks/whatsapp?agent_id=<AGENT_ID>Replace
<AGENT_ID>with the ID of the agent that should answer these calls. You can find your Agent ID by opening the agent in the Edesy Dashboard — it appears in the URL:voice-agent.edesy.in/agents/{AGENT_ID}. -
Verify Token:
edesy-whatsapp-webhook-verification-tokenUse this exact value — it is the verify token Edesy uses for all WhatsApp integrations.
-
Click Verify and save
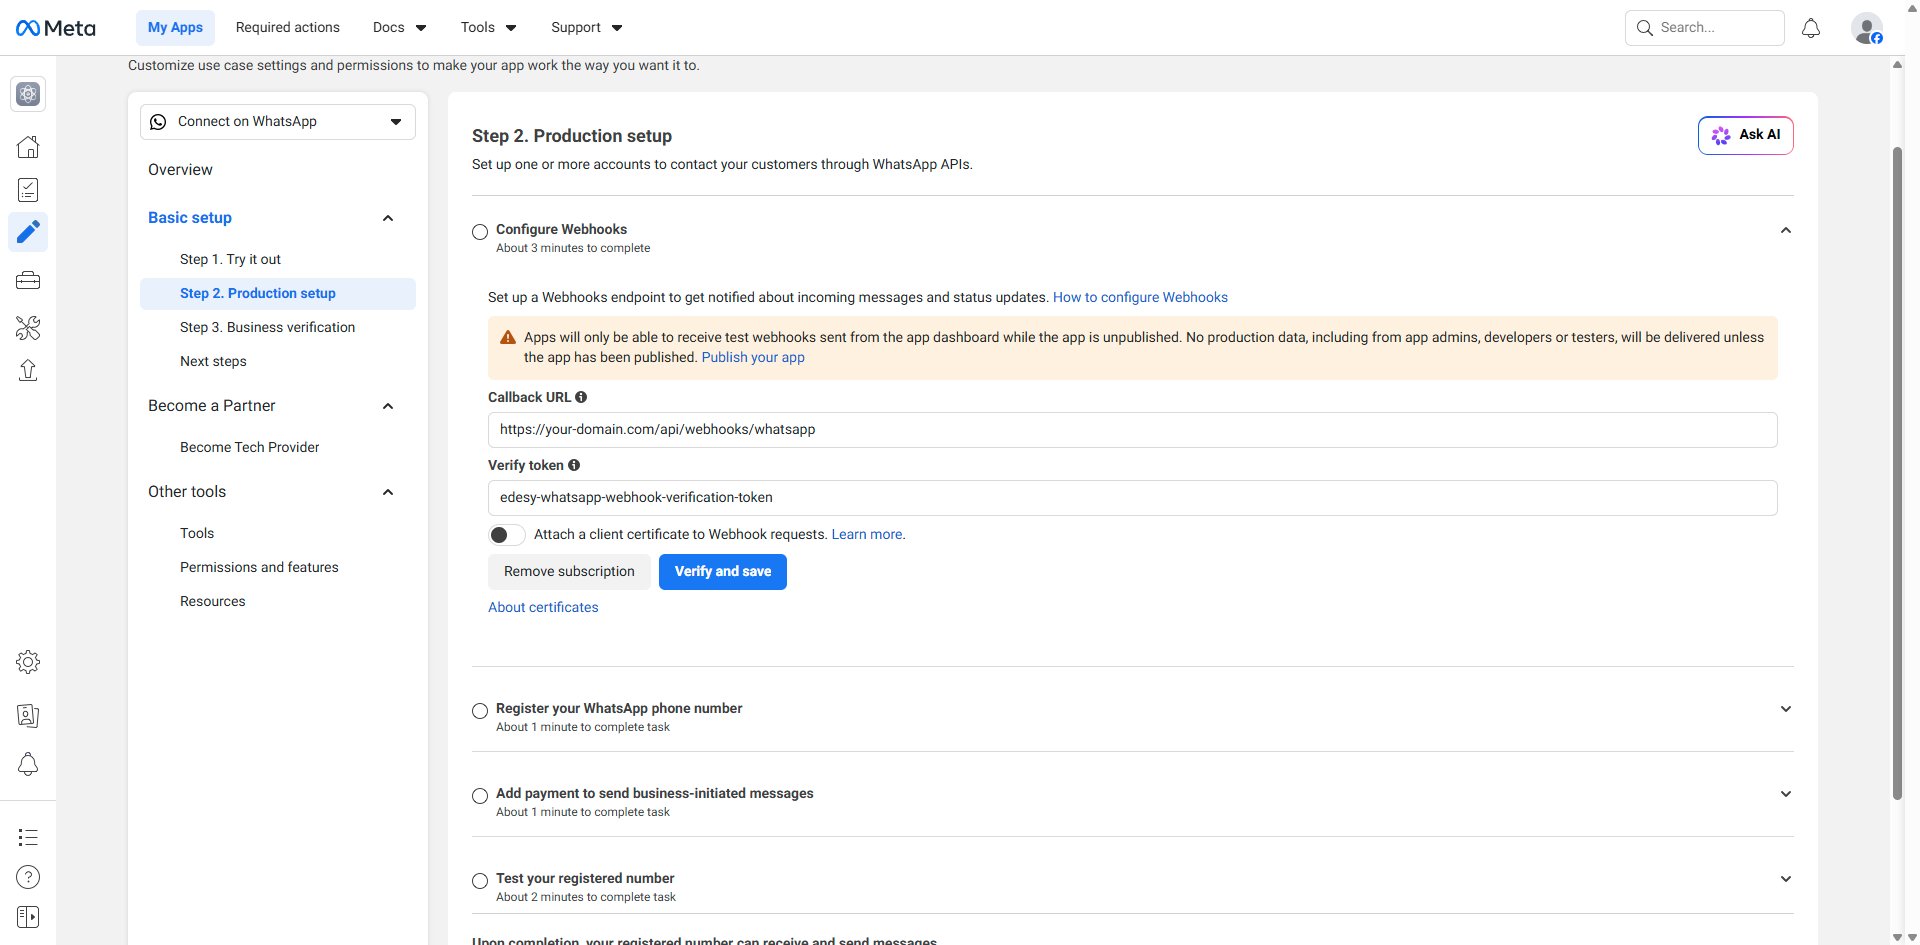
- Once verified, scroll down to the Webhook fields table and make sure the following are toggled to Subscribed:
messagescalls
Important: Apps only receive test webhooks while unpublished. No production data is delivered until you publish your app. While you're still testing, add yourself as a Tester under App roles so you can receive webhooks during development.
- Subscribe your app to your WABA by running this API call from your terminal or any HTTP client:
curl -X POST https://graph.facebook.com/v25.0/<WABA_ID>/subscribed_apps \
  -H "Authorization: Bearer <YOUR_ACCESS_TOKEN>"
You should receive { "success": true } in response.
Why is this extra step needed? The dashboard webhook configuration registers your URL, but the WABA-to-app subscription is a separate link that must be explicitly created. Without it, Meta verifies your webhook but never actually delivers call events to it.
Step 5: Enable Calling on Your Phone Number
Run the following API call to enable calling and callback permissions on your number:
curl -X POST https://graph.facebook.com/v25.0/<PHONE_NUMBER_ID>/settings \
  -H "Authorization: Bearer <YOUR_ACCESS_TOKEN>" \
  -H "Content-Type: application/json" \
  -d '{
    "calling": {
      "status": "ENABLED",
      "callback_permission_status": "ENABLED"
    }
  }'
Verify it worked:
curl -X GET https://graph.facebook.com/v25.0/<PHONE_NUMBER_ID>/settings \
  -H "Authorization: Bearer <YOUR_ACCESS_TOKEN>"
You should see "status": "ENABLED" inside the calling object of the response.
What is
callback_permission_status? When enabled, any user who calls your business number automatically grants your business permission to call them back for 7 days. This is required if you ever want to enable business-initiated (outbound) WhatsApp calls in the future.
Step 6: Add Your Credentials in the Edesy Dashboard
Now connect your WhatsApp credentials to Edesy:
- Open the Edesy Dashboard
- Go to Phone Numbers
- Click Add Credential (or Add Number) and select WhatsApp as the provider
- Fill in the three fields:
| Field | Where to find it |
|---|---|
| Phone Number | Use cases → Customize → Step 1. Try it out (the actual phone number string) |
| Phone Number ID | Use cases → Customize → Step 1. Try it out (the numeric ID next to the number) |
| Access Token | The permanent System User token generated in Step 3 |
- Save the credential.
- In the credential's Inbound Webhook card, pick the agent you want to handle inbound WhatsApp calls and click Save.
That's it. When you link an agent, Edesy automatically configures the per-number webhook on Meta's side so calls to your WhatsApp number route to the agent you selected — you don't need to copy any URL manually after Step 4.
Tip: You can change which agent answers calls anytime by editing the same Inbound Webhook setting. Edesy will reprogram the webhook on Meta automatically.
Testing Your Integration
-
Add your personal WhatsApp number as a test recipient. In the Meta dashboard, go to Step 1. Try it out → under Send a message from your test number → add your personal phone number as a recipient.
-
Save the test business number in your phone's contacts. This is required for WhatsApp to show the call option.
-
Place a WhatsApp voice call from your phone to the test business number. Your agent should pick up and start the conversation.
WhatsApp calling only works from a mobile device — WhatsApp Web and Desktop apps cannot place WhatsApp voice calls.
Troubleshooting
Not receiving webhooks after a call
- Confirm
callsis toggled Subscribed in the Webhook fields section of Step 2. Production setup - Confirm your app is subscribed to the WABA via the API call in Step 4
- Make sure your webhook URL is correctly configured with
?agent_id=<AGENT_ID>
Call connects but the agent doesn't answer
- In the Edesy Dashboard, go to Phone Numbers, open your WhatsApp credential, and confirm an agent is selected under Inbound Webhook
- Check that the selected agent is in Active status
- Verify your workspace has sufficient credits — see Billing & Credits
Calling not working despite being enabled in the UI
- Verify via the settings GET call (Step 5) that
"status": "ENABLED"is returned in thecallingobject — the dashboard toggle can occasionally disagree with the actual server-side state - Re-run the
POST /<PHONE_NUMBER_ID>/settingscall from Step 5 to force the state
Outbound calls fail with a permission error
- The user has not granted call-back permission. Make sure
callback_permission_statusis ENABLED and that the user has called your number at least once in the last 7 days
Authentication / "code 190" errors
- Your access token has expired or been revoked. Regenerate it using the System User flow in Step 3, then update the credential in the Edesy Dashboard
Going to Production
The test phone number and test WABA are sufficient for development. When you're ready for production:
- Complete Meta Business Verification at business.facebook.com/latest/settings → Business info → Start Verification (takes 1–14 business days)
- Register your production phone number under Use cases → Customize → Step 2. Production setup → Register your WhatsApp phone number. Virtual numbers from Twilio, Plivo, or Vonage work well
- Add a payment method under Step 2. Production setup → Add payment to enable business-initiated messaging
- Publish your app via the Publish button in the left sidebar of the Meta Developer Dashboard
For business-initiated (outbound) calls: your account must reach a messaging tier of 2,000 unique users/day — this builds up over time as you send messages.
User-initiated (incoming) calls have no messaging tier requirement and work in production as soon as business verification is complete.
Next Steps
- Creating an Agent — Build the agent that will handle your WhatsApp calls
- System Prompt Configuration — Tune your agent's behaviour and tone
- Variables & Templates — Personalise conversations with caller-specific data
- Telephony Providers Guide — Compare WhatsApp with Twilio, Plivo, and other channels
- BYOP Setup — Add traditional phone numbers alongside WhatsApp